This week I created a DashBoard for SCOM in Visio to present it on a SharePoint site. Normally you could use the Visio 2010 Addin for SystemCenter – Operations Manager. But this addin has some special prerequisites for the presentation on the SharePoint site, like installing SCOM components and special configurations on the SharePoint Farm. Also it has the limitation, that it can only present monitor states, and can’t present rule values (for example: disk usage).
So I created my own solution, which I will describe here. An overview to the steps:
- create an AD user with read permission to the SCOM database
- create an SQL user with read permission to the SCOM database
- create an new SQL view
- create unattended service account in SharePoint’s Secure Store Service
- create a Visio file and add an external data connection
- add data graphics to shape
create user accounts
First we need to create the user accounts and set permissions for the SCOM DB. For the development we will need two accounts:
- one account will be needed for the development of the Visio file. this should be an SQL internal account. After publishing the created Visio file to the SharePoint site, this account could be deleted / deactivated.
- the other account will be needed to access the SCOM DB from the SharePoint. it should be an Active Directory account and will be used later as an unattended service account in SharePoint’s Secure Store Service.
it’s okay, when you give both accounts only datareader access to the SCOM database.
create the SQL view
we create a new SQL view with this SQL code:
SELECT TOP (100) PERCENT dbo.BaseManagedEntity.Path, dbo.BaseManagedEntity.DisplayName AS [Display Name], dbo.BaseManagedEntity.Name,
 dbo.ManagedType.TypeName,
 CASE GenericView.HealthState WHEN 1 THEN 'Success' WHEN 2 THEN 'Warning' WHEN 3 THEN 'Error' ELSE 'Uninitialized' END AS [Health State],
 CASE GenericView.IsManaged WHEN 1 THEN 'TRUE' ELSE 'FALSE' END AS Managed,
 CASE GenericView.IsAvailable WHEN 1 THEN 'TRUE' ELSE 'FALSE' END AS [Is Available],
 CASE GenericView.InMaintenanceMode WHEN 1 THEN 'TRUE' ELSE 'FALSE' END AS [In Maintenance], Performance.RuleName, Performance.SampleValue,
 CONVERT(nvarchar(50), dbo.BaseManagedEntity.BaseManagedEntityId) AS ID,
 'http://scwebp:8075/OperationsManager/default.aspx#/health(targetid=' + CONVERT(nvarchar(50), dbo.BaseManagedEntity.BaseManagedEntityId) + ')' AS URL,
 dbo.BaseManagedEntity.LastModified, Performance.PerfmonInstanceName
FROM dbo.BaseManagedEntity INNER JOIN
 (SELECT StateId, BaseManagedEntityId, MonitorId, HealthState, LastModified, LastGreenAlertGenerated, DatabaseTimeModified
 FROM dbo.State AS State_2
 WHERE (DatabaseTimeModified =
 (SELECT MAX(DatabaseTimeModified) AS Expr2
 FROM dbo.State AS State_1
 WHERE (BaseManagedEntityId = State_2.BaseManagedEntityId)))) AS State ON
 dbo.BaseManagedEntity.BaseManagedEntityId = State.BaseManagedEntityId LEFT OUTER JOIN
 (SELECT Id, FullName, Name, Path, DisplayName, IsManaged, IsDeleted, LastModified, TypedManagedEntityId, MonitoringClassId,
 TypedMonitoringObjectIsDeleted, HealthState, OperationalState, StateLastModified, IsAvailable, AvailabilityLastModified, InMaintenanceMode,
 MaintenanceModeLastModified, BaseManagedEntityId, TimeAdded, LastModifiedBy
 FROM dbo.ManagedEntityGenericView
 WHERE (LastModified =
 (SELECT MAX(LastModified) AS Expr2
 FROM dbo.ManagedEntityGenericView AS ManagedEntityGenericView_1
 WHERE (BaseManagedEntityId = dbo.ManagedEntityGenericView.BaseManagedEntityId))) AND (TypedManagedEntityId =
 (SELECT MAX(CONVERT(nvarchar(50), TypedManagedEntityId)) AS Expr3
 FROM dbo.ManagedEntityGenericView AS ManagedEntityGenericView_2
 WHERE (BaseManagedEntityId = dbo.ManagedEntityGenericView.BaseManagedEntityId)))) AS GenericView ON
 GenericView.BaseManagedEntityId = dbo.BaseManagedEntity.BaseManagedEntityId INNER JOIN
 dbo.ManagedType ON dbo.BaseManagedEntity.BaseManagedTypeId = dbo.ManagedType.ManagedTypeId LEFT OUTER JOIN
 (SELECT dbo.PerformanceSource.BaseManagedEntityId, dbo.PerformanceSource.PerfmonInstanceName, dbo.PerformanceDataAllView.SampleValue,
 dbo.PerformanceDataAllView.TimeSampled, dbo.Rules.RuleName
 FROM dbo.PerformanceDataAllView WITH (NOLOCK) INNER JOIN
 dbo.PerformanceSource ON
 dbo.PerformanceDataAllView.PerformanceSourceInternalId = dbo.PerformanceSource.PerformanceSourceInternalId INNER JOIN
 dbo.Rules ON dbo.PerformanceSource.RuleId = dbo.Rules.RuleId
 WHERE (dbo.Rules.RuleName LIKE 'Microsoft.Windows.Server.%.LogicalDisk.FreeSpace.Collection') AND (dbo.PerformanceDataAllView.TimeSampled =
 (SELECT MAX(TimeSampled) AS Expr1
 FROM dbo.PerformanceDataAllView AS PerformanceDataAllView_1
 WHERE (PerformanceSourceInternalId = dbo.PerformanceDataAllView.PerformanceSourceInternalId)))) AS Performance ON
 dbo.BaseManagedEntity.BaseManagedEntityId = Performance.BaseManagedEntityId
WHERE (dbo.BaseManagedEntity.BaseManagedEntityId IN ('{EF10CE7E-43AA-DE50-6020-677ACC1FD7B5}', '{353314EC-1842-44D8-0937-2E12DB693FBA}',
 '{B6A10CC4-9376-20E6-DA03-E901C0347D4F}', '{FF9C3AFC-F6F3-93B5-9920-AA9A27F71E52}', '{383EAC78-AB34-2B51-8357-A152CE1737E6}',
 '{C9191AB0-6070-ADE8-9271-8C5A52B69E4B}', '{92D5F040-636C-D449-3D4B-F5024A9152F7}', '{AE10D00B-250D-36DE-E3C8-38F7FC98E3E5}',
 '{EC27D1D5-A550-3A50-82CC-A1F82314C53E}', '{83DA84B8-B036-458F-E847-27EF4A4C6C47}'))
if you use only the lines 1-41, the SQL query will show all monitored entities, which could be several thousand rows depending on the size of your Environment. to prevent long loading times, we will filter it. in my example, i filter it by the desired entityID, but of course, you can filter it by other properties.
The query will show a result like this:

create unattended service account in SharePoint’s Secure Store Service
On the the SharePoint Central Administration website home page, in the Application Management section, click Manage service applications.
-
Click the Secure Store Service service application.
-
On the ribbon, click New.
-
In the Target Application ID box, type an ID for the target application (for example, ScomSqlRead).
-
In the Display Name box, type a name for the target application.
-
In the Contact E-mail box, type an email address.
-
In the Target Application Type drop-down list, select Group.
-
Click Next.
-
Leave the default credential fields, and then click Next.
-
On the “Specify the membership settings” page:
-
In the Target Application Administrators box, type the account of the user who will administer this account.
- In the Members box, type Everyone or Authenticated Users.
-
create a Visio file and add an external data connection
In Visio Professional 2013, open a diagram or create a new diagram.
- On the ribbon, click the Data tab, and then click Link Data to Shapes.
- On the Data Selector page, select Microsoft SQL Server database, then click Next.
- On the Connect to Database Server page, type the name of your database server, then select Use the following User Name and Password, type in the previously created SQL internal user name and password, then click Next.
- on the Select Database and Table page, select your previously created SQL view.
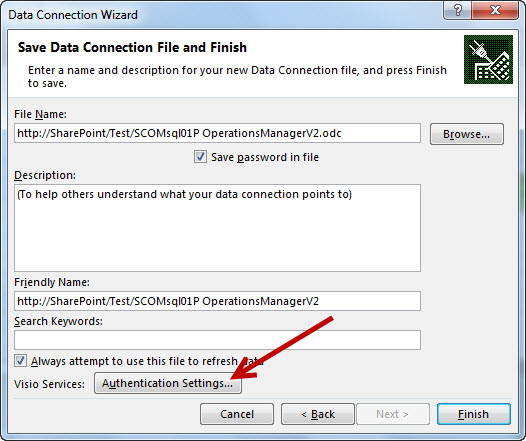
- on the Save Data Connection File and Finish page, browse the File Name to a location on your SharePoint farm, then click to Authentication Settings.
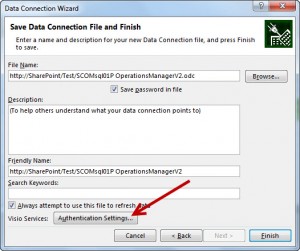
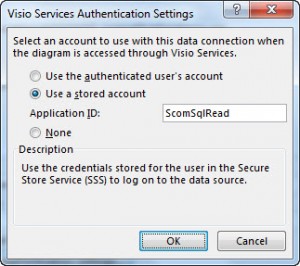
- On the Visio Services Authentication Settings window, select use a stored account and type in the name of the previously created unattended Service Account.
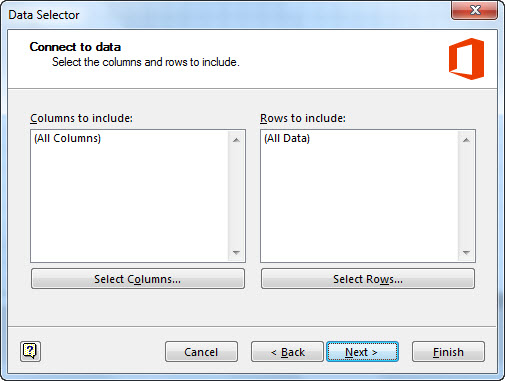
- on the Connect to data page, select All Columns and All Data, then click Next.

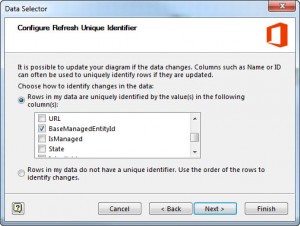
- on the page Configure Refresh Unique Identifier, select the BaseManagedEntityID and click Next.
- now you should have your datas visible in Visio:

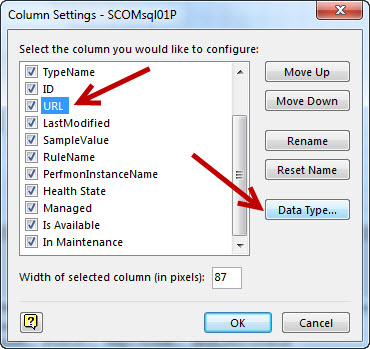
- To make the Shapes clickable, right click the External Data table and select Column Settings:

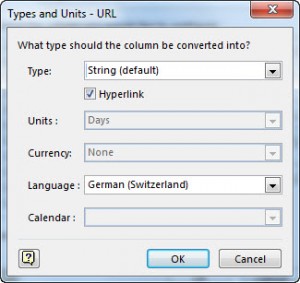
- in the Column Settings window, select the URL column and click to Data Type:

- mark the Hyperlink checkbox, then click twice to OK.


add data graphics to shape
after adding any type of shape to your Visio diagram, you can drag and drop your data rows to the shape.
the SCOM entities can have several states, which can presented by editing the Data Graphics. to do this follow this steps:
- right click your shape and select Data and then Edit Data Grahic
- now you can add several Icon sets like this:
| Icon Set: | Datafield: | Icon: | equals: |
| ={In Maintenance}&{Managed} | TRUETRUE | ||
| ={Health State}&{In Maintenance}&{Managed} | SuccessTrueTrue | ||
| UninitializedTrueTrue | |||
| WarningTrueTrue | |||
| ErrorTrueTrue | |||
| ={Health State}&{Is Available}&{In Maintenance}&{Managed} | SuccessTrueFalseTrue | ||
| UninitializedTrueFalseTrue | |||
| WarningTrueFalseTrue | |||
| ErrorTrueFalseTrue | |||
| ={Health State}&{Is Available}&{In Maintenance}&{Managed} | SuccessFalseFalseTrue | ||
| UninitializedFalseFalseTrue | |||
| WarningFalseFalseTrue | |||
| ErrorFalseFalseTrue | |||
| =STRSAME({Managed},”true”,TRUE) | FALSE |
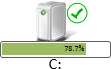
at shapes with rule values, you can now add data graphics, showing the value. for example the percentage usage of a logical disk:
| Data Bar Style: | Data field: |
| Progressbar | =100-{SampleValue} |
the shape should now look like this:
present the file to SharePoint
After creating the Visio diagram, save it to your SharePoint Farm as a Visio 2010 Web Drawing (*.vdw) file.
To add a Visio Web Access Web Part to a SharePoint page, do the following:
- Navigate to the site that contains the page that you want to add a Visio Web Access Web Part to.
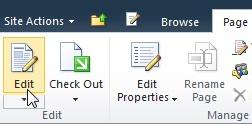
- In the ribbon, on the Page tab, in the Edit group, click Edit.
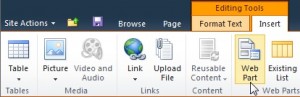
- Under Editing Tools, on the Insert tab, in the Web Parts group, click Web Part.
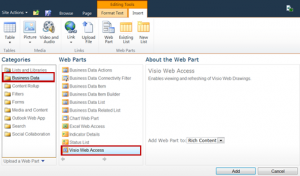
- do the following:
- Under Categories, click Business Data.
- Under Web Parts, click Visio Web Access.
- Click Add.
- In the opening instructions, click the link Click here to open the tool pane.
The Web Part Page and Web Part enter Edit Mode and the Web Part Tool Pane is displayed. - In the tool pane, expand Web Drawing Display, and enter the URL of the Web drawing in the Web Drawing URL text box. The diagram must have the file name extension .vdw.
- Click Apply and then click OK.

